When I started working for Shipyard, I was familiar with Docker and containerization, but Docker Compose was entirely new to me. I remember searching for tutorials, explanations, and quickstart guides, but very few of them answered any questions I had about Docker Compose. I wanted to begin with the most minimal Docker Compose deployment possible. I spoke with Elliott about this, and he walked me through the process of building and running a Flask app with Docker Compose. I believe this is a tutorial that would really have benefited me when I was learning about Compose, and I hope it can also help you get up and running with your deployments.
What is a Docker Compose file?
Docker Compose is a service that you can use to orchestrate one or more Dockerfiles. In recent years, Docker Compose has become a common practice when developing containerized applications. Docker Compose lets you write your application definition in the form of a YAML file, which you can use to build and run your app. These Docker Compose files streamline the development process, allowing for faster prototyping and iteration.
Docker Compose files are especially useful when running applications that have multiple Dockerfiles. Using a Docker Compose file makes working with containerized applications more straightforward, since it automates the deployment of several containers at once. Instead of employing multiple docker build and docker run commands, you can set up and run your entire app using docker compose up. You can also configure the behavior of your app’s services, such as defining environment variables, mounting volumes, port mapping, and much more.
Building a simple Flask web app with compose
Step 1: Setting Up A Flask App
Before we get started, let’s create a simple Flask app.
If you haven’t previously set up Flask on your machine, you can install it by running pip install flask in the terminal.
Navigate into your working directory of choice, then create a new directory for your Flask app using mkdir -p my_flask_app. Once inside this directory, create a new Python3 file app.py and paste the following code:
# app.py
from *flask* import *Flask*

*app* = *Flask*(*__name__*)

@app.*route*("/")
def hello_world():
    return "<h1>Starter Flask App</h1>"

if __name__ == '__main__':
    app.run(debug=True, host='0.0.0.0')
This app will create a simple webpage, which you can modify to your liking. Test it out by running python3 app.py from its root directory.
Step 2: Taking inventory
Now that we have a working standalone Flask app running on our machine, let’s take a step back and check out the components we need to get it running independently.
Our Flask app is rather simple; in order to get it set up on a virtual Python3 environment, we need to have: Flask, pip, and our app.py file. This will be important to keep in mind when creating a Dockerfile in the next step.
Step 3: Writing the Dockerfile
Next, our app needs a Dockerfile, which will allow us to containerize it. We’ll look at the app’s necessary components we selected in Step 2 and include them in this file.
Create your Dockerfile in the app’s root directory, and paste the following code:
# Dockerfile
FROM python:3.9.10-alpine3.14
WORKDIR /srv
RUN pip install --upgrade pip
RUN pip install flask
COPY . /srv
ENV FLASK_APP=app
CMD ["python","app.py"]
When we run this Dockerfile, it will create an image for our app using a Python3 virtual environment. This file will set our working directory to /srv and install the latest versions of pip and Flask in our container, then copy everything into the working directory. The last line of the file will run python app.py from the working directory, which will run our app within the container.
You can test this out by running docker build --tag mini-compose . followed by docker run -p 127.0.0.1:5000:5000 mini-compose. If everything is working, navigating to the IP will show your app in its current state.
Learn more about Dockerfiles and how to run them here.
Step 4: Composifying the App
Now that we can run our app with Docker, we may want to write a Docker Compose application definition. This file will define which services our app requires (in our case, only one). Using Docker Compose will make things easier for us, since we only need to run docker compose up to access our app now, instead of lengthier build and run commands. Our Docker Compose file will look like this:
# compose.yml
version: '3'

services:
  web:
    build: '.'
    ports:
      - '5000:5000'
Since our app’s stack is simple, we only need to specify our build path with build and define which ports we’ll want to expose with ports.
Bonus Step: Running on Shipyard
Now that we have an app with a valid Compose file, we can deploy it with Shipyard and get it running in an ephemeral environment!
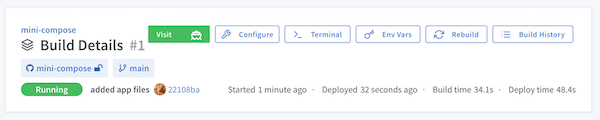
And there we have it: a Flask web app that we can share, preview, and test! From here, you can add more features and dependencies, then reflect any necessary application changes in the Dockerfile.